Improving insulation in a portable house begins with understanding how heat actually moves through the building. Thin walls, metal frames, unsealed joints, and exposed floors can create uncomfortable temperature changes. A warm room may still feel cold near a window or doorway. Small gaps matter.
This guide explains how to improve insulation in portable houses using practical, evidence-informed methods. It considers roof insulation, wall cavities, floor systems, windows, doors, and ventilation. Each area needs a different solution. For example, reflective foil may reduce radiant heat, but it cannot replace properly fitted bulk insulation where air movement is the main problem. Adding insulation without controlling moisture can also create hidden damage.
Experienced installers usually begin with an inspection rather than buying materials immediately. They check condensation marks, drafts, damp flooring, and heat loss around service openings. A simple smoke pencil or thermal camera can reveal problems that are invisible during a quick walk-through. However, these tools do not replace professional judgment. Results may change with wind, indoor humidity, and outdoor temperature.
The safest approach balances insulation thickness, airflow, moisture control, and local building requirements. Materials should suit the portable home’s structure and transport limitations. Heavy upgrades may affect wall strength or relocation plans. That detail is easy to overlook. This article compares realistic improvements, explains common mistakes, and shows where professional advice is worthwhile. No single insulation product solves every portable-house problem. A careful assessment usually saves more energy, money, and frustration than rushed installation.
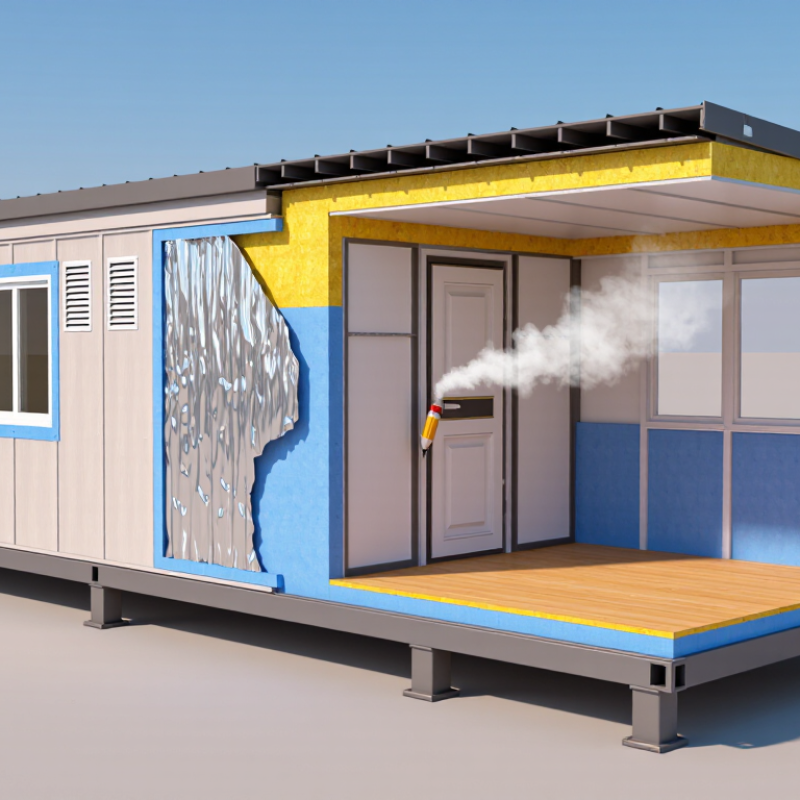
Portable house insulation improves fastest when the actual heat-loss areas are identified first. A practical inspection should begin at the roof, where warm air rises and weak ceiling insulation can create cold patches. Check roof panels, ceiling joints, and service openings around lights or vents.
Windows and doors often lose heat through worn seals and small gaps. On a windy day, move your hand slowly around each frame. A cool draft is useful evidence, not just a comfort problem. Pay close attention to corners, floor edges, and the connection between wall panels. These joints may look sealed while allowing air movement behind the interior finish.
The floor deserves careful attention, especially when the portable house stands above open ground. Cold air can pass through gaps around pipes, supports, and floorboards. A thermal camera can reveal uneven temperatures, but it should support, not replace, a physical inspection. Moisture marks also matter because damp insulation performs poorly and may hide a larger building problem.
I once focused too heavily on the walls and overlooked a loose door threshold. That small gap caused a noticeable draft near the living area. This is easy to miss. Record indoor temperatures, outdoor conditions, and suspected gaps before making changes. Prioritize repairs that stop air leakage, then assess whether additional insulation is needed. Aim for evidence, not assumptions.
A portable house loses heat quickly through thin walls and poorly sealed joints. Begin with a whole-envelope inspection, not only the visible insulation. For walls, mineral wool or dense fiberglass can fit framed cavities well. Closed-cell foam offers strong air sealing, but it needs careful installation and moisture planning. Leave no gaps around electrical outlets, corners, or service openings. Small gaps matter.
The roof usually deserves the highest attention because warm air rises. Use insulation with a suitable thermal resistance value for your climate. Add a continuous layer when framing allows it. This reduces thermal bridges across studs and roof members. Keep ventilation paths open beneath the roof covering. Trapped moisture can damage timber quietly. I have seen well-insulated rooms develop condensation because air sealing was ignored.
Floors need durable insulation that resists damp ground air. Rigid boards or protected mineral wool may work, depending on clearance and local conditions. Seal the floor perimeter carefully. For windows, double glazing and low-emissivity coatings can improve comfort. However, even efficient glass performs poorly with unsealed frames. Use flexible weatherstripping and inspect it each season. Avoid treating reflective foil as a complete insulation system. It needs an air space to function properly. Material choices should follow local building requirements and a moisture assessment. There is no perfect package; installation errors can defeat expensive materials.
Portable house insulation works poorly when outside air moves around it. In site inspections, I often find gaps around doors, windows, floor edges, and service pipes. Start with the gaps. A cold draft near the skirting can make a well-insulated wall feel useless. Use a smoke pencil on a windy day, or feel for air movement with your hand. Mark every leak with removable tape. Small openings matter.
Seal joints before adding or upgrading insulation, because insulation cannot reliably stop moving air. Use compatible caulk for narrow cracks and low-expansion foam for larger penetrations. Around windows, check the frame, trim, and sill separately. Inspect plumbing and electrical entry points carefully. Do not block required vents or drainage paths. Local building rules may specify fire-resistant materials and ventilation clearances, so a qualified inspector should review uncertain areas. This step is not glamorous. It is often the most valuable.
After sealing, inspect the interior on a cold or windy day. Look for damp spots, peeling paint, or uneven temperatures near the floor. A thermal camera can help, but it does not replace hands-on checking. I have seen rushed sealing trap moisture behind new insulation, creating a problem that stayed hidden for months. Let repairs cure as directed, then install insulation without compressing it. Measure twice. Portable homes shift slightly over time, so recheck seals each season and after major storms.
Install insulation safely within the portable house structure, rather than simply adding thicker material. The International Energy Agency reported that buildings consumed about 30% of global final energy in 2022. In a portable house, careful installation can reduce heat transfer through thin walls, floors, and roof panels. Measure each cavity first. Fit insulation tightly, but never compress it. Gaps around windows, service pipes, and electrical outlets can create cold drafts.
Safety comes first.
The U.S. Department of Energy recommends combining insulation with air sealing for better performance. Use compatible sealant around penetrations, then install insulation according to the manufacturer’s stated thermal rating. Keep insulation away from heat-producing equipment, recessed lights, and flues unless approved protection is provided. Do not cover electrical junction boxes. Moisture control also matters. The correct vapor-control layer depends on the local climate and wall design, so a qualified building professional should inspect the assembly before closing it.
Portable homes experience movement during transport and strong wind. Secure batts or boards with suitable fixings, especially beneath floors and around roof edges. Leave required ventilation paths open near roof insulation. A common mistake is sealing every visible gap without checking drainage or condensation risks. That can trap moisture behind panels. Recheck the insulation after the first cold season. Real performance may differ from laboratory ratings, and that difference deserves attention.
What Is the Best Way to Improve Portable House Insulation?
Improving a portable house starts with moisture control, not thicker insulation alone. During inspections, I often find damp corners behind furniture and condensation around metal window frames. These areas need attention before adding insulation. Seal roof joints, floor edges, and service penetrations with durable materials. Use a moisture-resistant vapor control layer where the local climate requires one. Avoid trapping water inside the wall assembly.
Ventilation must work with insulation. A tightly sealed portable house can develop stale air and hidden condensation. Install controllable vents in wet rooms, and keep air moving through kitchens and bathrooms. A small extraction fan should discharge outdoors, not into the roof space. Check vents after heavy rain. Poor installation can cancel good design.
Tips: Keep furniture a few centimeters from exterior walls. Inspect corners monthly during cold weather. Use a simple humidity meter indoors. Aim for stable humidity rather than perfect numbers. Insulate the floor carefully, especially above a raised base, because cold air can pass beneath it. Seal gaps around doors, but do not block intentional ventilation openings. Reflective foil may help in specific assemblies, yet it cannot replace correctly fitted bulk insulation. I have seen overly compressed insulation perform poorly. More material is not always better. Loose sections and unsealed joints deserve equal attention.
Improve moisture control, ventilation, and thermal performance with a balanced building-envelope strategy.
The chart compares idealized relative heat flow for common wall insulation levels. The values are calculated from heat flow proportional to 1/R-value, using R-13 as the baseline: R-19 allows about 68% of the baseline heat flow, while R-30 allows about 43%. Actual performance also depends on thermal bridging, air leakage, installation quality, and local building codes.
For moisture control, keep indoor relative humidity around 30–50% where practical, provide continuous drainage and flashing, and seal air leaks. For ventilation, use code-compliant mechanical ventilation; ASHRAE 62.2 commonly references a 0.35 air-change-per-hour minimum rate, subject to its full calculation method and local requirements.
Inspect the whole envelope, including walls, roof, floors, windows, joints, and service openings. Start with drafts, not thickness. Mark gaps around outlets, corners, pipes, doors, and floor edges.
Mineral wool or dense fiberglass can fit framed wall cavities well. Closed-cell foam can improve air sealing, but installation requires careful moisture planning. Do not leave gaps around outlets, corners, or service openings.
Warm air rises, so roof heat loss can be significant. Use insulation with suitable thermal resistance for the local climate. A continuous layer can reduce heat transfer through framing members. Keep ventilation paths open beneath the roof covering.
Check doors, windows, floor edges, skirting, pipes, and electrical entries. Use a smoke pencil or your hand on a windy day. Mark each leak with removable tape. Use compatible caulk for narrow cracks and low-expansion foam for larger openings.
Inspect damp corners, condensation, peeling paint, and cold metal window frames. Use controllable ventilation in kitchens and bathrooms. Extraction fans should discharge outdoors, not into the roof space. Do not trap water inside the wall assembly.
Rigid boards or protected mineral wool may suit floors above a raised base. The material must tolerate damp air beneath the building. Seal the floor perimeter carefully. Cold air can enter through surprisingly small openings.
Double glazing and low-emissivity coatings can reduce cold surfaces. Unsealed frames still perform poorly. Inspect the frame, trim, and sill separately. Replace worn weatherstripping each season.
No. Reflective foil needs an air space to work properly. It cannot replace correctly fitted bulk insulation. Compressed insulation may perform poorly, even when more material is used. No package is perfect. Inspections can miss hidden problems, so recheck after storms and during cold weather.
Improving insulation in a portable house begins with identifying where heat is lost most quickly, including walls, the roof, floors, windows, doors, and joints between structural panels. The best approach to how to improve insulation in portable houses is to select materials suited to each area, while considering thickness, thermal resistance, weight, and available space. Roof and wall insulation can reduce heat transfer, floor insulation helps prevent cold from rising, and insulated window treatments can limit drafts and radiant heat loss.
Before adding insulation, seal gaps around doors, windows, vents, utility openings, and panel connections to prevent uncontrolled airflow. Installation should be completed carefully within the structure, keeping materials dry and avoiding blocked ventilation paths or unsafe contact with electrical components. Finally, manage moisture through proper vapor control, drainage, and ventilation. These steps work together to create a more stable indoor temperature, improve energy efficiency, reduce condensation, and make the portable house more comfortable throughout the year.

Stayvora House